
Feature Builder Power Tool – Introduction
This post introduces Microsoft’s Feature Builder Power Tool (Feature Builder) and describes its major components.
Feature Builder is a Visual Studio Extension that allows a developer to quickly create a feature extension for Visual Studio 2010 (VS). By introducing a new framework, developers are now able to easily integrate templates, add-ins and documentation in a single “feature extension” package. This package is a single .vsix file, which will install as an extension in VS. The actual development of add-ins and documentation has also become easier thanks to the framework and a new Domain Specific Language (DSL) for their creation. Creating a new right-click context menu add-in has been reduced to a three click process within Feature Builder!
Feature extensions may contain three main components: Tools, Code and Map.
Tools
The “Tools” refer to Visual Studio menu commands. Feature Builder provides an easy interface for creating new VS menu commands and corresponding functionality. These menu commands may be placed in any right-click context menu or menu bar, the corresponding functionality may include any .NET code.
Feature Builder introduces a new DSL for tool creation, a GUI builder shown below:
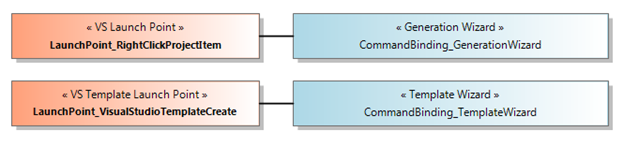
Here we see the wiring of a “Launch Point” to a “Command Binding”. The top-left item is a Visual Studio launch point corresponding to a right-click on project item event. This item is tied to a command binding on the right, which launches a WPF wizard. These items were drug out of the toolbox (pictured below) and placed on the designer surface.

Each of these items has associated properties, which can also be edited in the GUI. For example, here are the properties for the right-click launch point:
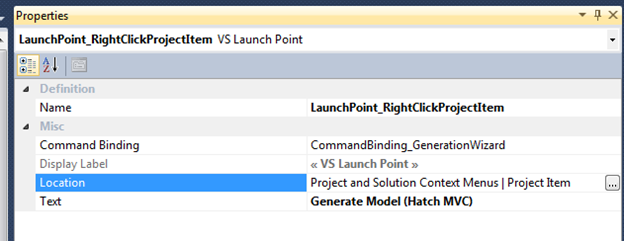
The Location property corresponds to the CommandBar location where the command will be located. In the example above, the command will display on right-click of any project item. There is a small wizard to easily specify other locations:

Adding a new right-click context menu add-in involves dragging a VS Launch Point onto the designer, specifying its location inside Properties, dragging a command binding onto the designer and then adding a connector between the launch point and the command binding.
Commands are classes which implement a FeatureCommand class, which comes with the Feature Builder framework. Creating your own custom command is as easy as implementing this class and overriding the Execute() method, which will be called when the command is called. This method can contain any custom code (a wizard or custom window to display information, for example) and external calls.
Code
The “Code” refers to a VS template, which may be any created template. Feature Builder allows you to take a template you have created and “unfold” it in a more controlled environment, with before and after commands available. Templates may contain variables which can be replaced on unfolding, and these variables may be specified through a before unfold command (ex. that command contains a wizard which allows the user to specify the variable value). Thus, dynamic templates are possible.
Map
The “Map” includes a workflow diagram and documentation. The workflow of the map provides the user with guided, and restricted if desired, use of your feature. Map documentation provides in-VS documentation of your feature.
Links
Microsoft Feature Builder Power Tool in the VS gallery (Feature Builder has a dependency on the Visual Studio SDK. Install the SDK first, then restart your PC and then install Feature Builder.)
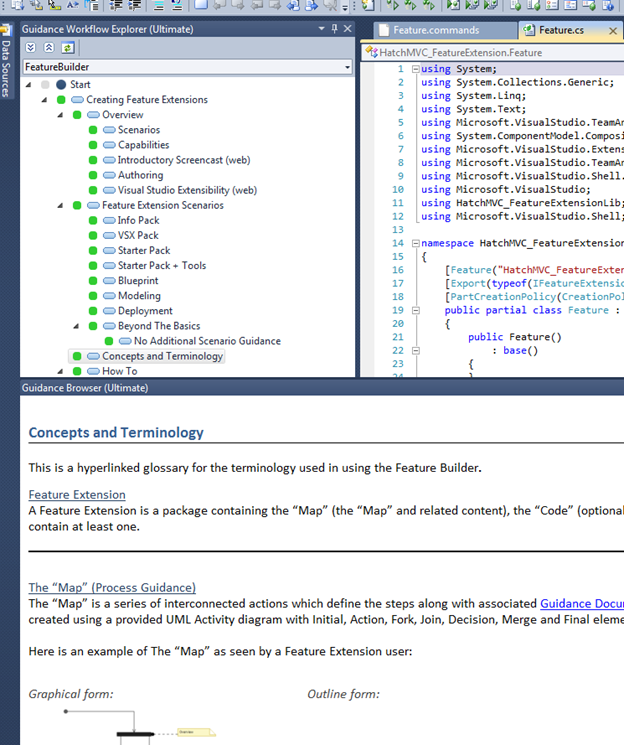
Note: There is very little documentation for Feature Builder outside of the map inside a Feature Builder project. To read that documentation, install Feature Builder and go to create a new project (Feature Builder installs several project templates, the usable ones start with “Feature Extension –”, the rest are mainly demos). Create a new “Feature Extension – Blueprint Scenario” project and open the Guidance Workflow Explorer tab, the documentation will show up in the Guidance Browser (another tab) as you select options in the Guidance Workflow Explorer.


