
“Transforming” App.Config Files in a TFS Build
Do you develop using your production or staging SQL server? If so, please don’t. If not, great!
How do you keep track of which Web.Config is pushed to your server? VS2010 has an improved Web Deploy process that allows you to use config transforms to adjust your Web.Config files based on the build configuration. Scott Hanselman has a nice article and talk on this.
What about your backend, non-web projects? Unfortunately, their App.Config doesn’t support transforms (yet). If you just need to replace the App.Config file, it is fairly simple to do in a TFS Build. (Note: There are a couple MSBuild hacks that can help you do this locally, but not for TFSBuild)
First, create a new configuration file in the project called “App.Lab.Config”. We’re using the “Lab” configuration, but you can use “Release”, “Prod”, or whatever you want.
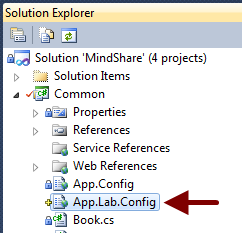
Copy the contents of App.Config into your new file. Change whatever settings or connection strings you need. Make sure you check this and the project file in to source control.
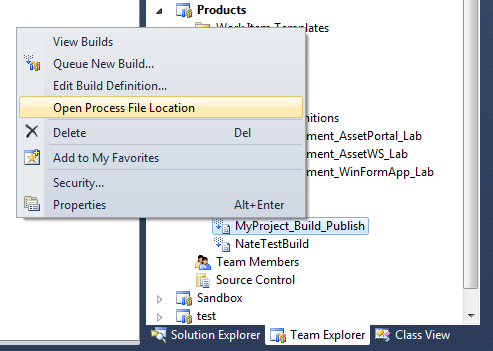
Now open the build process from Team Explorer. Right click the build and select Open Process File Location.
Make sure you get the latest version of the file and open it.
Navigate to the Compile the Project section a little over halfway down the page. Drag an Invoke Process activity to run right after the “Run MSBuild for Project” inside the “Try Compile, Test, and Associate Changesets and Work Items”.
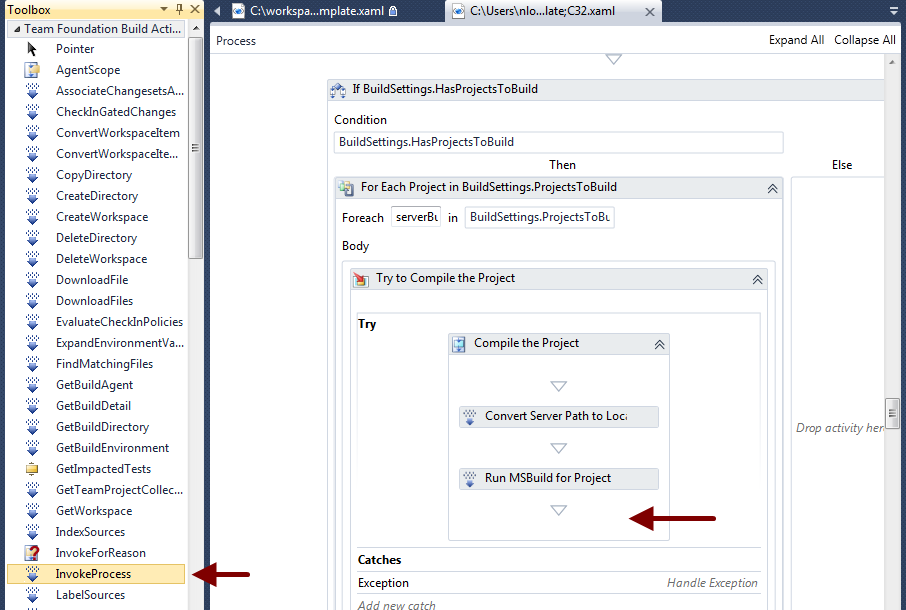
The App.Config is normally renamed to <Output Assembly Name>.Config, so we’ll overwrite that with our version.
View the Properties of this activity and set the following values:
- Display Name: “Copy App.Config”
- FileName: “xcopy”
- Arguments: SourcesDirectory + “\<ProjectName>\App.” + platformConfiguration.Configuration + “.config” + ” ” + BinariesDirectory + “\” + “<Output Assembly (.exe or .dll)>.config” + ” /Y”
If you’d like logging, drag a WriteBuildWarning or WriteBuildMessage into the StdOutput and/or ErrOutput from the xcopy for debugging/trace info.
Change the properties of these to have a name, higher importance if you want to, and set the message to use the output from the xcopy command. Do the same for errOutput.
- Display Name: “Write StdOutput”
- Importance: Microsoft.TeamFoundation.Build.Client.BuildMessageImportance.Normal or Microsoft.TeamFoundation.Build.Client.BuildMessageImportance.High
- Message: stdOutput
Now save and check this file in. It should be in the “BuildProcessTemplates” folder under your root project folder.
Be sure to change your build configuration by editing your build definition. You’ll find it under the Process tab.
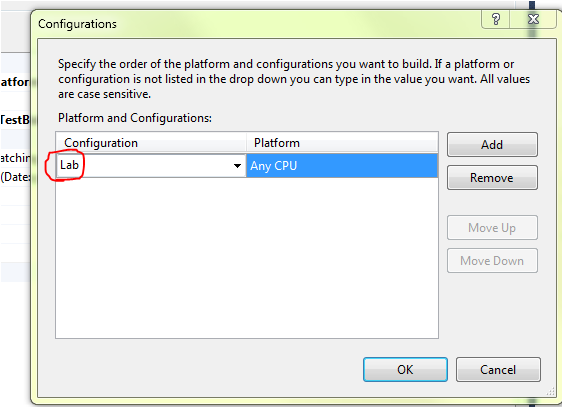
The dropdown might not have your “Lab” configuration listed, but you can manually type it into the field.
Now the build process should xcopy the files over to your binaries.
Obviously this specifically tailors the build process file to your single solution, so this will need to be changed for any multi-project builds. Hopefully you’re a little more comfortable editing your builds, but if you get stuck, leave a comment and we can help you get more complicated builds going.
Happy Testing!


