
My First NPM Package
What follows is my quest to build a sharable component library using Vue 3.
A project came along that required a way to share components between two Vue projects, but that was also supposed to lay the foundation for using some of the same components across more projects in the future. As this is a JavaScript project, NPM felt like the appropriate place to make this happen.
I’ve never published an NPM package before, so I hoped there would be a simple-to-follow guide ready for me, but there wasn’t a single source of truth. I had to cobble together several pieces of information before finding a satisfying answer, and here I present the fruit of all the labor.
NOTE: I am building this specifically for VUE 3 with Vite, but it could be any other JavaScript framework that uses a package.json file.
- Create a new project.
npm create vite- Pick name, framework, and variant (JS/TS)
- Open the new project.
cd ./projectName
- Install the basic packages.
npm install
At this point, you have a very basic app. If you want to try it out, you can run npm run dev, and you should be able to get a server.
- Make your own component.
- Create a new file under src/components/CustomButton.vue with the following content.
- Create the library file.
src/index.ts(name will be used in vite.config.ts file)- Define your package exports here.
- If you are using TypeScript, you will need type definitions. You can use
npm install vite-plugin-dts --save-dev.
- Update
vite.config.ts.- If you started a new project, replace all content with the code below.
__dirnamemaybe undefined, addnpm i @types/node --save-dev- Note the build.lib.filename, you will need it in the
package.jsonfile.
- Update
package.json- Most of the important changes need to happen here. If you are unsure what and why, please review the current documentation.
- Make sure you have this:
- You will need to add the following code.
- Note your
FileNameInDistname from thevite.config.tsfile. - None of the files will exist until we build the project, so don’t worry about those yet.
- Note your
- The full
package.jsonfile should look like this:
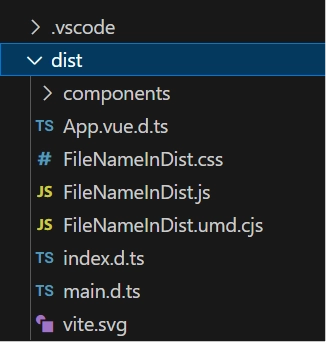
- Build
npm run build- Assuming you didn’t encounter any build errors, you should have a new
distfolder with the content in the image below. - If you are missing the
index.d.tsfile, make sure that you specify thetsconfig.app.jsonlocation for thedtsplugin in yourvite.config.tsfile. - Another common mistake is having the wrong filetype in the
package.jsonfile.
- At this point, you could publish the package to NPM.
npm publish, but I won’t cover that in this guide. Instead, I will show you how to test it locally.
- Test the new package locally.
- You will need a new app for this. You can create one with
npm create vitejust like before. - Inside the app, you can install the package from above
npm install <path to library>. Note that the path should point to the folder that contains thepackage.jsonfile.
- You will need a new app for this. You can create one with
Depending on your app setup, here are two ways to use the component from the library.
Option 1 (Register Component)
Option 2
If all you wanted was to build a package and test it locally, congratulations! You have arrived at your destination! However, if you want to know how you can take the current library and turn it into a Monorepo that can handle multiple libraries, stay tuned for my next post!