JavaScript Events: An Introduction
Yes, JavaScript Events. Without them, the world wide web would be a dystopian wasteland of static HTML. Without them, we’d still be relying on blink and marquee tags to jazz up our LiveJournals. Fortunately, this is not the case. The modern web runs on JavaScript, and JavaScript is driven by events.
But what does it mean to say, “JavaScript is driven by events”? My goals today are to elaborate on and better articulate the event-driven nature of client-side JavaScript (JavaScript running in a web browser) and build for you a firm foundation of events in JavaScript.
Though I will not discuss event-handling techniques specific to any major JavaScript framework (examples are given in plain JavaScript), the foundation we build will give you greater insight into the operations that are abstracted away by your framework of choice. A basic understanding of how JavaScript and HTML work together in a web browser is the only prerequisite for following along with this post.
Let’s begin.
The Document Object Model (DOM)
We can’t discuss events without an introduction to the DOM (this will soon be obvious). Feel free to skip this section if you are confident in your mastery of the DOM.
The DOM is a JavaScript object representation of the HTML document displayed by a browser. It forms a tree-like structure, which mirrors the HTML and provides an API for JavaScript to interact with an HTML document. Take a look at the following HTML document:
In this example, the “root” of the tree is the html tag, which branches into two “nodes”, head, and body, which both branch into more “edges” and nodes. You can visualize the tree structure by tilting your head 90 degrees counter-clockwise while viewing the HTML, or you can look at this diagram:
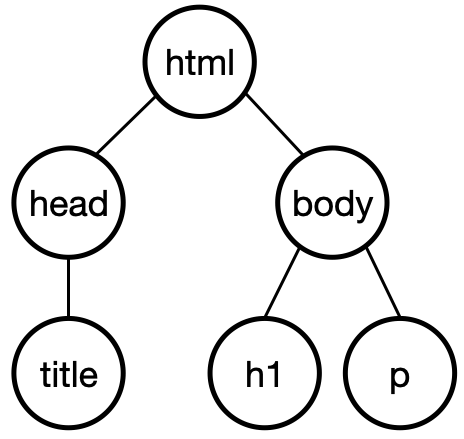
The relationships and terminology are the same as you would expect in say, a family tree. In this diagram (this _DOM_), we would say that h1 and p are siblings of one another and are children of body, body is the parent of h1 and p, and every node under html is a descendant of html.
Above this tree sits document, and it is from document that we can search the DOM to find nodes in many different ways through JavaScript. For example:
There is much, much more to the DOM API than we will discuss today, but this gives us enough to continue the discussion on events. Mozilla provides wonderful documentation for this and generally anything web-related here, and I would encourage you to utilize them as a resource. Let’s move on.
Event-Driven Programming
Listening for Events
What happens when you load a web page in a browser?
In simple terms, an HTML document is loaded, JavaScript scripts are loaded, and a web page is rendered. From then on, the browser waits for interaction from a user. It waits for a user to trigger events. Clicks, scrolls, copies, pastes: these are types of events (a comprehensive list of event types can be found here. A web application (i.e., the whole of a website’s JavaScript) chooses what events to listen and respond to. This is why we say client-side JavaScript has an event-driven programming modal.
There are three aspects to an event that we are most concerned with today:
- Types: the event type tells us what sort of event occurred (e.g., a mouse clicked)
- Targets: the event target tells us on which DOM element the event occurred (e.g., what element did the mouse click)
- Listeners: these are functions attached to targets, listening for and responding to specific event types (e.g., when the mouse clicks a button, execute some function)
We are focused on user-triggered events in this discussion, but not all events are triggered by user actions. For example, some “lifecycle” events are triggered by the browser when document is loaded and ready.
To make concrete the concepts we’ve discussed so far and those we’ll discuss in the remainder of this post, we will create a small example and add functionality as we go. Here is the scenario:
Our business is a monthly subscription box of cat-based items. All agree that the idea cannot fail, but our investors are worried that our adoption numbers are not meeting our projections. We need to perform a survey to determine how to better cater to our subscribers. To avoid financial ruin, we have created a simple form to survey customers on their favorite cat breed:
This form is rather useless. It can be submitted with no input, and nothing happens when the submit button is clicked, except that the text input is mysteriously reset.
First, we should require input before allowing the form to submit. We decide to disable the button if the text input is not valid. We assume that any input with any number of characters greater than 0 is a legitimate answer for now (our domain experts schedule a meeting to further discuss the cat breed field’s validation rules).
Whatever rules we decide on, we will achieve the desired outcome by giving the button a “disabled” attribute to prevent clicks:
…and then listening to events from the input. We do this by adding an event listener to the input element in our JavaScript file, survey.js. We plan to find elements in our DOM using the id attribute, so we have prefixed them with “js-” to make this decision obvious to anybody viewing the HTML. This is a stylistic choice and is not strictly necessary:
In the first two lines, we see the DOM in action. We use getElementById to get references to the DOM nodes that have the ID’s “js-breed-input” and “js-submit-button”. Once we have hold of these references, we attach an event listener to the input, which disables or enables the button.
Recall that the aspects of an event we are concerned with are type, target, and listener:
- Type: the type is “input”. This event is triggered (fired) any time the value property of the input changes. The
valueproperty will be whatever string of characters is put into the actual input element. HTML elements other thaninput(e.g.,textarea) can also trigger events of type “input”, but in this example, they are both named “input”. - Target: the target is the element that the event is triggered on. In this example, that is
input. - Listener: we add a listener using the DOM method
addEventListener()and pass in a function to handle the triggered event. When the event is triggered, our function is called. In this example, we disable the button if the length of thevalueof thetargetof theeventis not greater than 0 and enable it if it is. Note the idiomatic solution!event.target.value.lengthmakes use of the fact that length values of 0,null, orundefined, are all considered false in JavaScript (technically, falsy).
addEventListener() is not the only way to add an event listener to an element, but it is the best way. Standard events can be set directly by assigning a function to that event handler on the element. For example, we could add a click handler like so:
…or you could add it inline in HTML:
There are two big drawbacks to these approaches:
- You cannot assign an event handler for a custom event.
- You cannot assign multiple event handlers to the same event type.
The addEventListener() function does not suffer from these deficiencies:
You may only listen to standard events and you may only need a single event listener, but for the sake of consistency, I would recommend you always add and remove events in the same way: with addEventListener() and removeEventListener(). Now that we know how to add our own listeners, let’s discuss how we might interfere with other event listeners.
Canceling Default Event Behavior
Did you know your browser is listening for and handling several events by default? It’s true! I’ll give you two examples:
- Clicking an
atag (i.e., link) will navigate your browser to thehrefof that tag. - A submit
buttonin a form like the one in our example will submit and clear the form when clicked.
We must reckon with this second example in our cat breed survey, so let’s discuss why this behavior could be problematic.
First, if you are doing validation on form fields after submit is clicked, then you will need to hold off on submitting the form until you are satisfied with the validation. In our working example, we’re validating the input before enabling the submit button, but this solution isn’t foolproof.
Second, you may need additional validation wherever your form data is received remotely, and that validation may fail. At that point, you may want to return helpful errors to your web app without clearing the form fields. As I mentioned, the form will be reset by default. Not good.
What can we do about this? We can prevent the default behavior by calling preventDefault() on the event:
You can use the preventDefault() function to prevent any event’s default behavior (unless they were set up to be unpreventable). But how does calling a function on an event in one listener prevent other listeners from performing their functions? That is a great question and a perfect way to segue into the topic of event propagation.
Event Propagation
Take a look at our current HTML and script once more:
When an event is triggered on a node (e.g., button), that event propagates (“bubbles”) up the DOM looking for and triggering any matching event listeners along the way. For example, if button has a “click” handler, form has a “click” handler, and body has a “click” handler, each handler will be hit in turn, as the event bubbles up the DOM.
In many instances, this will have no observable effect on your application, but there will come a time when you do not want an event listener further up the DOM to handle the same event. Sometimes there will be overlapping events, and you will need to handle them accordingly. You can prevent this “bubbling” by calling stopPropagation() on the event:
It is also possible and often desirable to call this in conjunction with preventDefault():
The order in which these two functions are called and where they are called in the handler function is irrelevant. JavaScript is a single-threaded language, which means handleClickEvent() will complete before any other event handlers can be called.
Any event listener in the chain of listeners may halt propagation at their level. Subsequent event listeners are given the additional information of currentTarget as well as target, so they can reference the original element which triggered the event as well as the current element handling the event.
Note: if there are multiple listeners for the same event type on the same target, calling stopPropagation() on the first will not stop the subsequent event handlers. To do this, you must use stopImmediatePropagation().
You may be thinking that event propagation is pointless in the best of times and a source of strange bugs in the worst of times, but there’s an upside. To demonstrate, let’s build a loading spinner into our example and control it with event propagation. First, we’ll add a spinner element as a sibling to our form and hide it by default:
Let’s assume that showing and hiding this div is sufficient to make the spinner function. We want to show the spinner while we’re waiting for a response to our form submission. To do this, we can create a custom “loading” event that carries one of two messages: “we’re loading” and “we’re not loading”. We’ll let that event bubble up, and we’ll expect some element higher in the DOM to handle the event. Here again is the full script with comments and the new custom loading event logic:
We now have a “loading” event handler on body, which sets the hidden property of our loading spinner in much the same way as we set the disabled property on our button. The setTimeout function is used here to simulate a remote call to our server, which may take a few seconds to return a response.
CustomEvent is a short and sweet class (documented here) used to dispatch custom events. These events can be set to bubble or not, and they can be given arbitrary data to carry along. In the example above, a custom event is dispatched from our button. We already hold a reference to button and so it is convenient to use here, but the event could just as easily be dispatched from form, and indeed that may provide better context for the event (it is the form submission that is loading after all, not the button).
At this point, it is safe to say that events have secured the success of our cat-based subscription box business. But for the sake of completeness, let’s talk about removing event listeners.
Removing Event Listeners
We’ve learned how to add and interact with events in several different ways, but what if we want to remove an event listener? Unsurprisingly, an event handler can be removed in the same way it can be added:
Or, more curiously, a listener can be created to remove itself after a single triggering:
In this example, handleClick will fire on the first click and be immediately removed as a listener. If you can imagine a scenario in which you need an event triggered once and only once, then you may use this solution and rejoice in the elegance of the event listener disposing of itself.
Conclusion
With that, I believe we’ve built the strong foundation of knowledge we sought to build today. You are now more prepared than ever before to develop for the web. Nothing will surprise you, and nothing can stop you. If you wish to know more information, please check out the resources listed throughout this post and below. Thank you for reading.