Getting SSL Certificates on AWS Elastic Load Balancers in Windows
Author’s note: This article was put together with help from these posts: ServerFault post, another ServerFault post, Anu Chandy post. They have great info, but lacked a full step-by-step explanation.
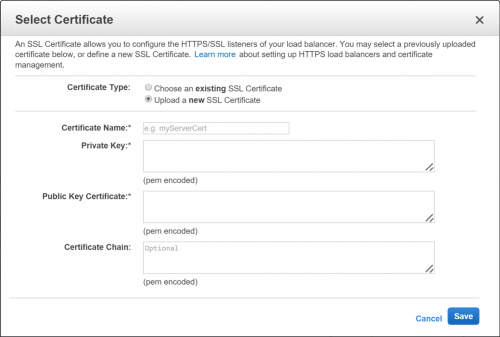
The prompt from AWS for uploading a new SSL certificate can be a little scary:
Here are some steps that can help you get an SSL certificate you currently have registered with IIS into this form. Note: I’m not an SSL, certificate, or security expert, so use these methods at your own risk. For a good explanation of what SSL is and how it works, check out this article.
Exporting the Certificate
For this, you will actually use MMC. Get to a command prompt and run mmc. Once this opens, click File and then Add/Remove Snap-in. Select “Certificates” from the list on the left and click Add. Choose the appropriate account to manage (this may take some guessing) and click OK to see your certificates.
Find the certificate you wish to export in the tree. Right-click the certificate and click All Tasks, then Export. When prompted, select “Yes” to export the private key. Select “.pfx”, and ensure “Include all certificates in the certification path if possible” and “Export all extended properties” are checked. If they are not available, this certificate may not be exportable. Choose a password (you’ll need this for later) and export.
Extracting the Private Key and Public Key Certificate
You’ll need OpenSSL for these steps. A Windows version is available here.
To export the private key (encrypted), use the following command:
openssl pkcs12 -in.pfx -nocerts -out key.pem
You’ll be prompted for the password you set when exporting. It will also ask for another password to encrypt the private key. Remember this one too (or use the same password). This will create the key.pem file. It will have —–BEGIN ENCRYPTED PRIVATE KEY—– in the file.
To remove this encryption, run the following command:
openssl rsa -in key.pem -out server.key
You’ll need the password from the last OpenSSL command where you exported the key. Now you should have the unencrypted private key. It will have —–BEGIN RSA PRIVATE KEY—– in the file. The contents of this file go in the Private Key prompt in the AWS dialog.
Export the public certificate with the following command:
openssl pkcs12 -in.pfx -clcerts -nokeys -out cert.pem
Again, you will need the password from when you exported the certificate from MMC. You now have the public certificate. It will have —–BEGIN CERTIFICATE—– in the file. The contents of this file go in the Public Key Certificate prompt in the AWS dialog.
Extracting the Certificate Chain (if needed)
If you have a chained certificate, you may need to do this step. If not, your certificate will be valid but the chained certificates (whether to another authority, or from previous versions of your certificate) will not be valid. This may not show up as a warning on all browsers or devices, but is poor form. A good way to check that your entire chain is valid is this site. Scroll all the way down the page and ensure you have green checks all the way.
Export the chained certificates with the following command:
openssl pkcs12 -in.pfx –nodes -nokeys -out chain.pem
Again, you will need the password from the original export. You now have every certificate in the chain marked by —–BEGIN CERTIFICATE—– and —–END CERTIFICATE—–.
That was easy, right? You should just be able to paste that into the Certificate Chain prompt and party, right? Wrong. AWS will not accept the certificate chain in that order, and the error message is less than helpful to non-experts:
Error creating certificate
Unable to validate certificate chain. The certificate chain must start with the immediate signing certificate, followed by any intermediaries in order. The index within the chain of the invalid certificate is: -1
The way to resolve this issue is a bit wonky, but it works. First, remove the final certificate (the one you originally exported) from the list. It should be the first certificate in the file. Next, put the remaining certificates in reverse order. You can try to do this in the chain.pem file, but creating a new file and cutting/pasting may be easier. Now you have all of the chained certificates (not including your certificate) in reverse order. The contents of this file go in the Certificate Chain prompt in the AWS dialog.
Click Save and it should be set up! You should be able to reuse this certificate elsewhere in your AWS account.
Hope that saves you some headaches. Thank you for making the web a safer, better place!
Note: If you have questions, please do not post any certificate or key information in the comments.


