
Isolating 32-bit COM Components on 64-bit Build Servers
A few weeks back while getting Mako XRM ready for launch, I was working through an issue involving ClickOnce build and deployment. I was attempting to isolate a 32-bit COM component so it would not need to be registered on every end-user’s computer upon ClickOnce install. MSDN has a decent article describing the process (http://msdn.microsoft.com/en-us/library/ms165432(v=vs.80).aspx) and it seemed simple enough to carry out. I isolated the reference as suggested and everything seemed fine on my machine. Issues arose when attempting to build the solution out on the TFS build server. I repeatedly ran into this error:
![]()
Microsoft.Common.targets (2580): Problem isolating COM reference eWebControl: No registered classes were detected for this component.
I struggled for some time wondering if I needed to register the COM component in some special way on the build server. As I was running out of options, I ran across this MSDN article (http://msdn.microsoft.com/en-us/library/56e00bfh.aspx). The article states:
“On a 64-bit machine, Framework64/<version>/msbuild cannot resolve COM objects registered as 32-bit components. For example, if you register a COM object with regsvr32 and then try to build a project targeting the x86 platform with Framework64/<version>/msbuild, the build is unable to resolve the COM object. If instead you build with Framework/<version>/msbuild, the build is able to resolve the COM object.”
I had assumed that because I set Platform Target to “x86” in my project properties, the build was running as x86. However, the build server was still running the 64-bit version of MSBuild regardless of what my project properties were set to. To remedy this, I had to mess with the build process parameters (Team Explorer -> Builds -> Edit Build Definition -> Process Tab):
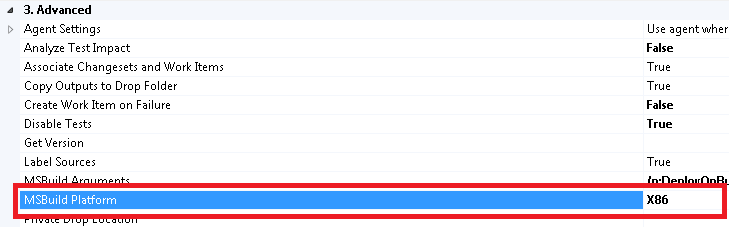
That flag determines whether the build runs Framework64/<version>/msbuild.exe or Framework/<version>/msbuild.exe. Simply switching that flag from “Auto” to “x86” solved my issue. The solution ended up being quite simple, but I did spend a good bit of my (and others’) time on it. I hope this post saves someone else’s time tracking down and fixing the cause of the build server error.


