
ClickOnce Publish and Deploy from Team Foundation Server 2010
by
| April 29, 2011 | in
Overview
ClickOnce technology is a very powerful way to distribute your applications to end users. It is especially nice for easily distributing updates to your application. Even if you don’t plan to distribute your application using ClickOnce technology, it is still a great tool for deploying daily updates for QA during development.
However, publishing and deploying a ClickOnce application from a Team Foundation Server (TFS) Build Server is not supported by default. But by following the directions below, you can quickly set up a TFS Build Definition that will:
- Correctly set/increment your ClickOnce Publish Version in your manifest
- Needed for updates so previously deployed ClickOnce apps will know that a new version exists the next time they are launched
- Correctly set your PublishURL in the ClickOnce manifest
- Create your ClickOnce publish directories after the projects have been compiled by TFS
- Deploy your ClickOnce publish directory to a network drop location
By following the directions below, you should be able to configure your ClickOnce project in less than 10 minutes. It’s really pretty easy after the first time.
This discussion covers deploying our example ClickOnce application using Web Deployment. However, you can also deploy a ClickOnce application as a network file share, or even distribute it on CD.
Before we talk specifically about configuring your ClickOnce deployment, I’ll just give a quick overview of ClickOnce applications while the topic is fresh on my mind.
Once you have successfully published and deployed your ClickOnce application, QA personnel or other users can then simply be given a URL that will allow them to download and install your ClickOnce application. From then on the application can be launched directly from the user’s Start Menu. At launch, it can automatically check for new versions and update if one is available.

Note: Notice that you can optionally pass in query parameters, in the example URL above an activation key, that will be available to your ClickOnce application the first time it is launched.
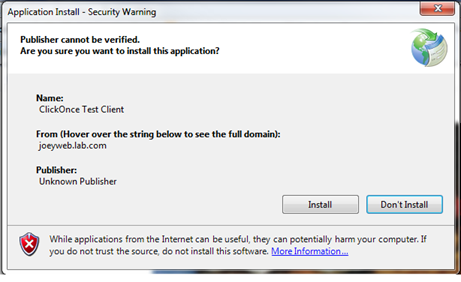
The user will be presented with a download progress dialog, then the above Install dialog displays, prompting them to install the ClickOnce application. Notice that this application is an Unknown Publisher. Ideally you would sign your ClickOnce manifest with a trusted certificate, discussed later.
Also, this ClickOnce application is being installed with Full Trust, much the same as a regular installer. However, you can also optionally install your ClickOnce application with partial trust, in which case the user will be prompted to grant the requested minimum trust permissions.
Regarding debugging, read this blog post that shows how to enable verbose logging of ClickOnce installs and updates.
After installation the ClickOnce application will automatically launch.
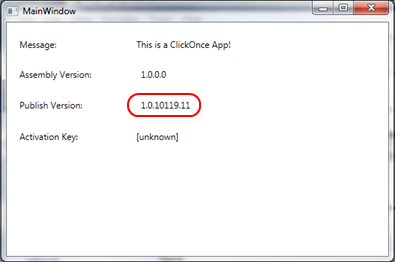
Important: In the main window of the example ClickOnce application, the Assembly Version, Publish Version, and Activiation Key (which we passed in as part of the URL) are shown. Note that the Publish Version is NOT the same as the more familiar Assembly Version. The Publish Version is included as part of the ClickOnce manifest, and it is what is used by ClickOnce to determine whether there is a new version available when checking for updates. Part of the build process workflow you will be using automatically generates this Publish Version using the following format, 1.0.(BuildDate:ymmdd).(Rev).
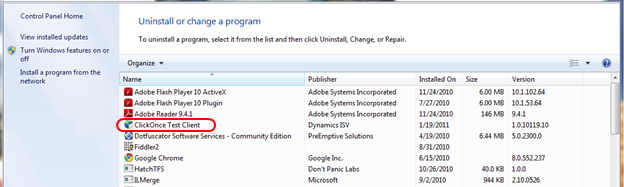
The user will be able to launch the ClickOnce application directly from their start menu like a normal application. The user can also uninstall the ClickOnce application from the Programs and Features Control Panel.
What becomes really useful is that the next time you perform a TFS build, the Publish Version will be automatically incremented and the user will see the following dialog when they launch their ClickOnce application.
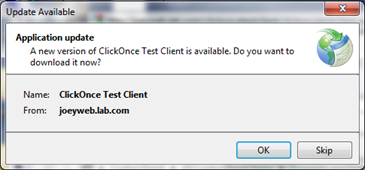
Notice how the ClickOnce Publish Version revision number is now 11.
That’s a quick review of ClickOnce. Let’s move on to actually implementing this coolness in your solution!
Setting up your Solution’s TFS Build Definition
The following are the steps you need to take to get automated ClickOnce publish and deploy working in your solution.
Download the DontPanicWithClickOncePublishBuild.xaml file and copy it into your solution’s BuildProcessTemplates directory and add it to source control. This build process template was built upon our existing DontPanicBuild.xaml template. Therefore, you can use this template even if you don’t have ClickOnce applications in your solution. The build should behave the same as before.
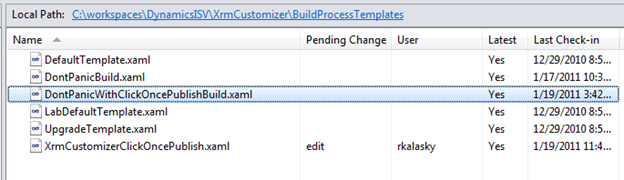
Go to the Process view and select DontPanicWithClickOncePublishBuild.xaml.
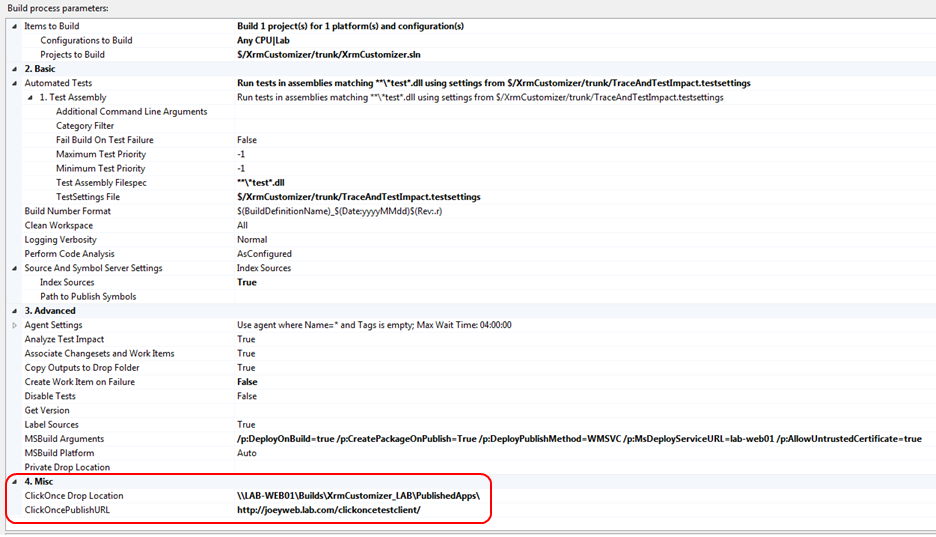
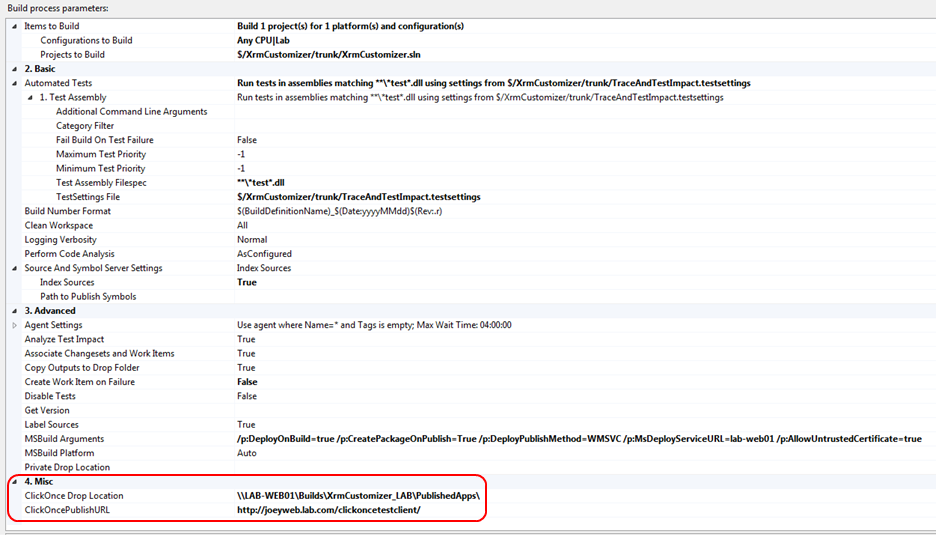
Review all the Build process parameters to make sure they match what is shown below. The two custom arguments that are specific to ClickOnce are circled.
- ClickOnce Drop Location: Set this to the UNC network path where you want your ClickOnce published applications to be deployed.
- ClickOncePublishURL: Set this to the Publish URL that you will direct your end users to for installing/updating your ClickOnce application.
Configuring Your ClickOnce Project
There are three steps to configuring your ClickOnce project: Adding a click once flag, setting project security settings and settting project publish settings.
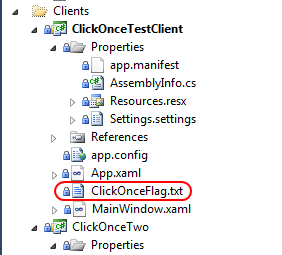
Adding a ClickOnceFlag
Now go to your Solution Explorer and add a ClickOnceFlag.txt file to your ClickOnce project(s). This file is just a blank text file that the TFS build template workflow uses to identify ClickOnce projects.
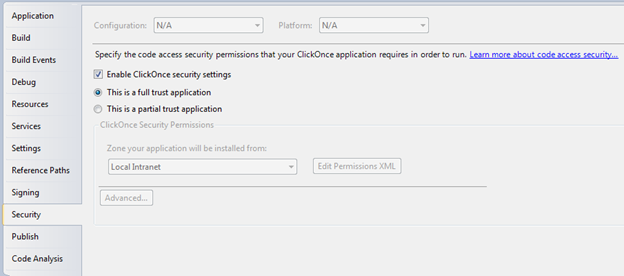
Security Settings
Open your ClickOnce project’s properties window. In the Security tab, select the Enable ClickOnce security settings checkbox. Setting the security to anything other than full trust is beyond the scope of this post.
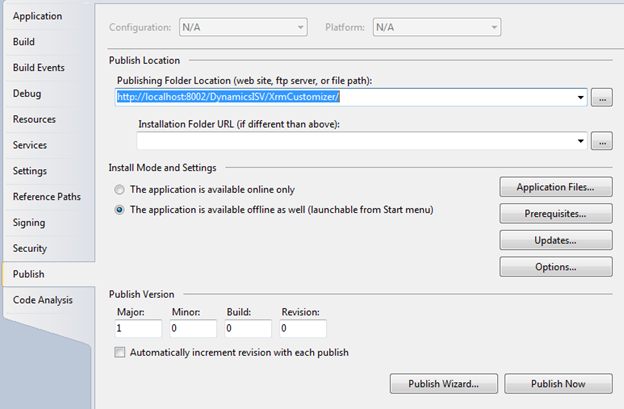
Publish Settings
In the Publish page there are many settings. Many of these apply to manually publishing the application from the Visual Studio IDE. For instance, we are going to override the Publish Version and Publish Location, so it is irrelevant what it is set to in this window.
However, you will probably want to make sure to select “The application is available offline as well (launchable from Start menu)”. Otherwise the user will only be able to launch your ClickOnce application from the browser.
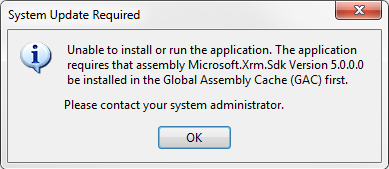
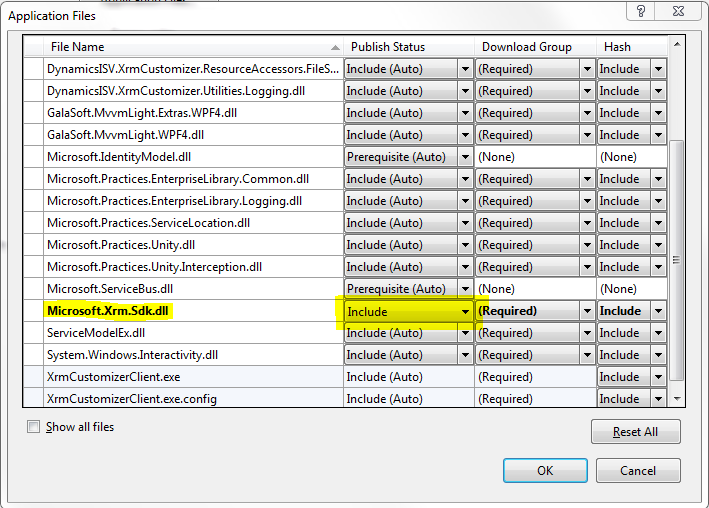
Application Files
The Application Files dialog allows you to specify which DLLs will be included in your distributed app. Your app should work fine with the defaults, but there are instances where the defaults fail and a necessary DLL will not be included. Below is an example failure on attempted install:
To fix this, change the trouble DLL’s Publish Status from “Include (Auto)” to “Include”, as shown in the dialog below:
Prerequisites
In the Prerequisites box, you may not need to change any of the defaults which only require the .NET 4.0 Client Profile. However, in the example ClickOnce application that is reading a query parameter out of the PublishURL, I needed to change to require the full .NET 4.0 framework since I require System.Web to parse the query string. (Code for this is shown below just in case you are interested in how to do this.)

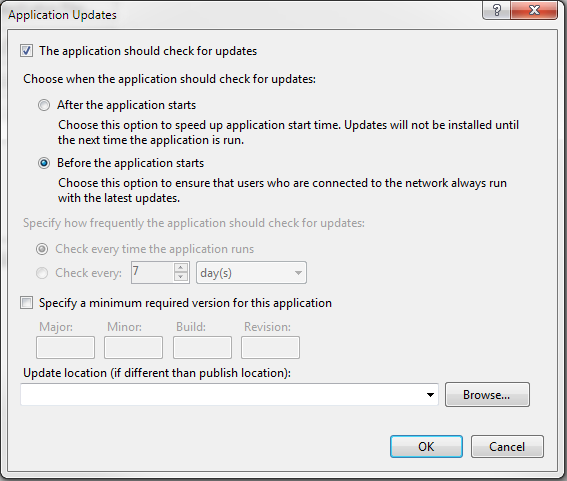
Updates
If you want to enable automatic updating for your ClickOnce application every time it is launched, you need to turn this option on in the Application Updates box.
Options
In the Publish Options box, configure your ClickOnce manifest description options.
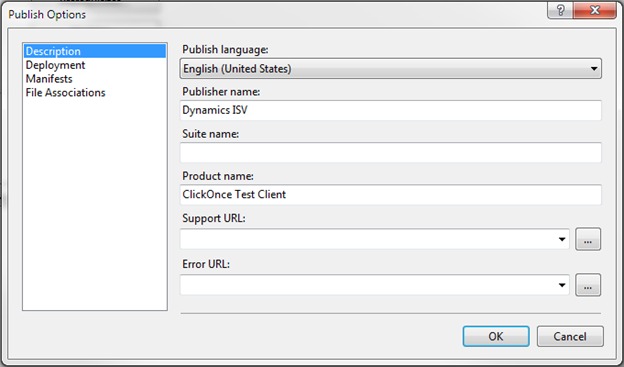
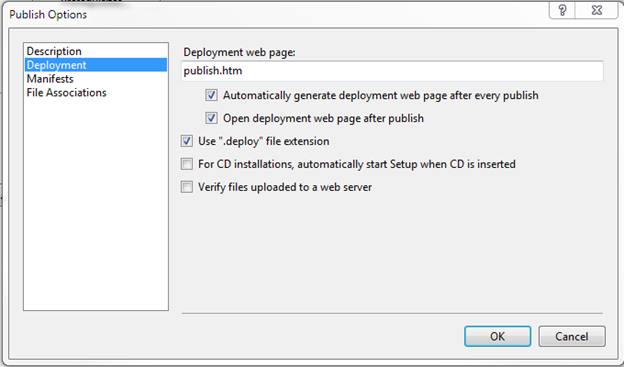
Note: The deployment options are ignored by TFS build as MSBuild will not create the publish.htm page (and it’s not really needed anyway). However, you may want to set them as follows if you want to manually publish and test.
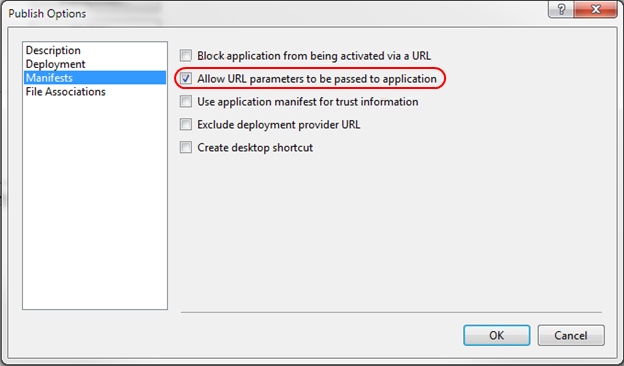
If you want to pass query parameters in your ClickOnce PublishURL, make sure you select the “Allow URL parameters to be passed to application” checkbox.
That’s it! Seriously, if you configured everything correctly, you should now be able to right-click on your TFS Build Definition and select “Queue New Build…”.
Unless you’re interested in the technical details of the build process template, you’re done and can stop here. Otherwise, read on…
Technical Notes on DontPanicWithClickOncePublishBuild.xaml
The following section contains some notes on the custom build process template workflow that performs the actual ClickOnce publish and deploy. These notes are mainly here because it is incredibly hard to look at a build process template workflow and know what has been changed. Creating this template required a lot of painful trial and error, and I would never want to have to duplicate this from scratch!
Open the DontPanicWIthClickOncePublishBuild.xaml file in Visual Studio. Make sure you check it out first if you are planning on making any changes.
Variables
There were some ClickOnce-specific variables that needed to be created that are used by the workflow.
Click on the Variables button at the bottom edge of the workflow screen. Variables have scope within a workflow so to see these ClickOnce variables, scroll down until you see and click on the Compile the Project sequence.
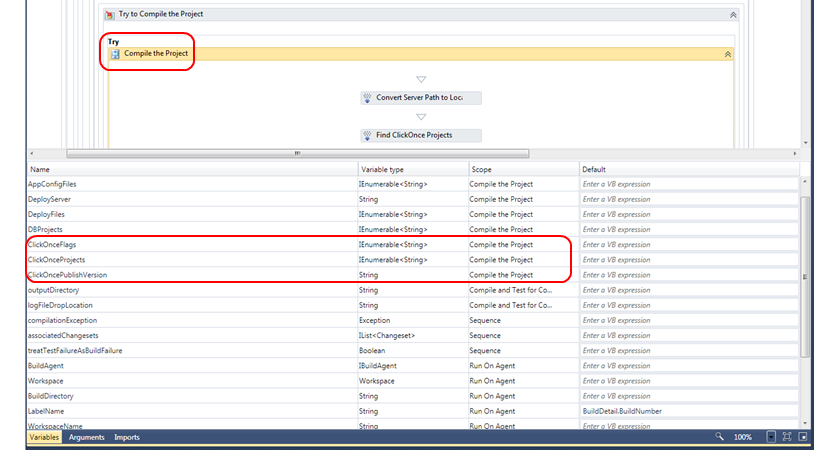
The three variables are:
- ClickOnceFlags: This variable will be set to a list of file paths containing any ClickOnceFlag.txt files found in your solution. This list is used to identify the ClickOnce projects in your solution.
- ClickOnceProjects: This variable will be set to a list of the file paths to your ClickOnce .proj files. This project file name is used to set the <projectname>.publish directory of your published ClickOnce application when it is copied out to your ClickOnce Drop Location folder.
- ClickOncePublishVersion: This variable will be automatically set by the workflow to “1.0.(BuildDate:ymmdd).(Rev)”. This variable is used to set the ClickOnce Publish Version in your ClickOnce manifest.
- Example: 1.0.10119.7
- Note: Only the last digit of the year is used because we cannot have any part of the version number greater than 65536. Technically this means that in 2020, the year will roll back over to zero and we may have to tweak it. I can live with that!
Arguments
Two arguments were also created that are passed in from the Build Definition when a new build is initiated. Click the Arguments button.

The two arguments are:
- ClickOnce Drop Location: Set this to the UNC network path where you want your ClickOnce published applications to be deployed.
- ClickOncePublishURL: Set this to the Publish URL that you will direct your end users to for installing/updating your ClickOnce application.
To see these arguments in your Build Definition as shown below, you need to add them to the Metadata list. Click the Metadata “…” default value button to edit this list. Add these two variables to the list and make sure View this parameter when: is set to “Always show the parameter”.
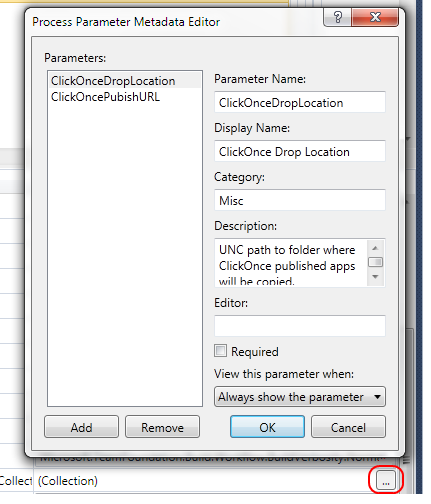
Once you have done this, saved and checked in your build process template, the next time you open the Build Definition you will see these arguments as shown below.
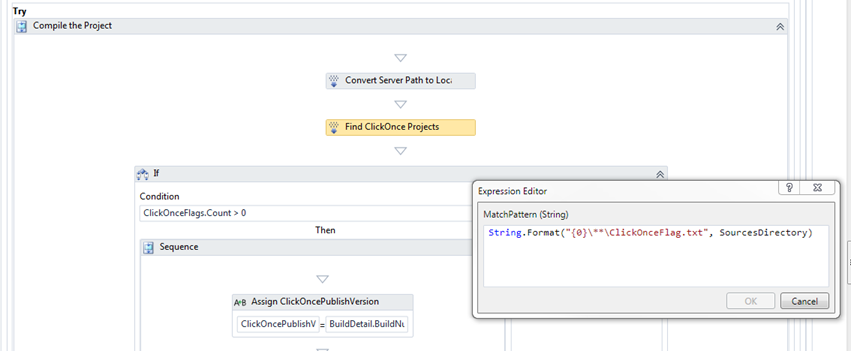
Find ClickOnce Projects
The first customization to the workflow was adding a FindMatchingFiles activity to identify your ClickOnce projects.
MSBuild (compile)
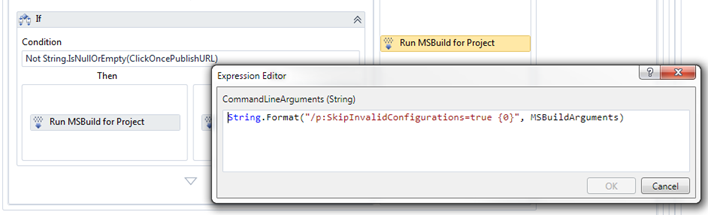
Next the default MSBuild activity that compiles your solution was replaced by an If Statement Control Flow. This control flow will fire three different variations of MSBuild based on whether there are any ClickOnce projects in your solution.
If there are any ClickOnceFlags.txt files found, the control flow will next assign the ClickOncePublishVersion by grabbing the last portion of the BuildDetail.BuildNumber, which contains the Build Date and Revision at the end. Remember, we are only grabbing the last digit of the year.
Example: BuildDetail.BuildNumber = XrmCustomizer_LAB_20110114.1
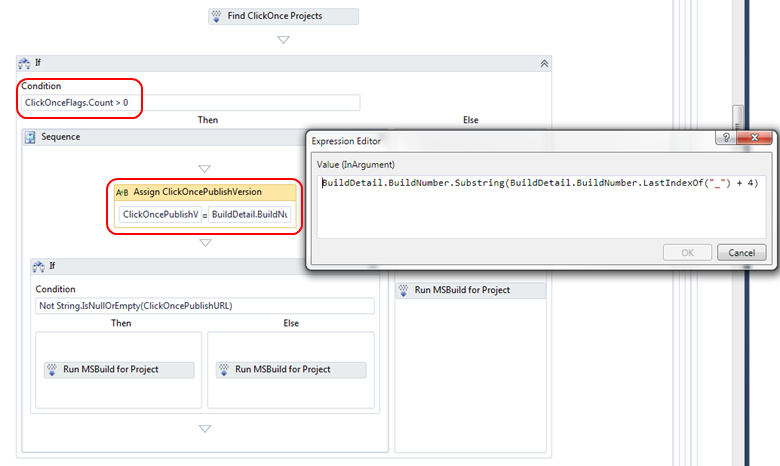
We then have another nested If control flow that checks to see if the ClickOncePublishURL argument has been passed in or not.
Important: The /p:ApplicationVersion shown below sets the ClickOnce manifest Publish Version, NOT the application assembly version. We HAVE to set this at compile time, because later on when we actually publish the ClickOnce application the existing manifest will simply be copied over by MSBuild, not rebuilt. Publishing from the MSBuild command-line DOES NOT work like publishing from the Visual Studio IDE, this was probably the most confusing part of getting this workflow to work.
Finally, we compile the solution by invoking MSBuild with three possible command-line arguments:
- ClickOnce projects with a ClickOncePublishURL
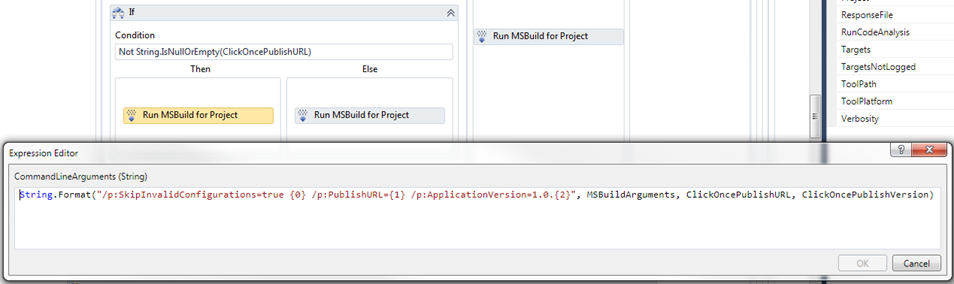
- ClickOnce projects with no ClickOncePublishURL
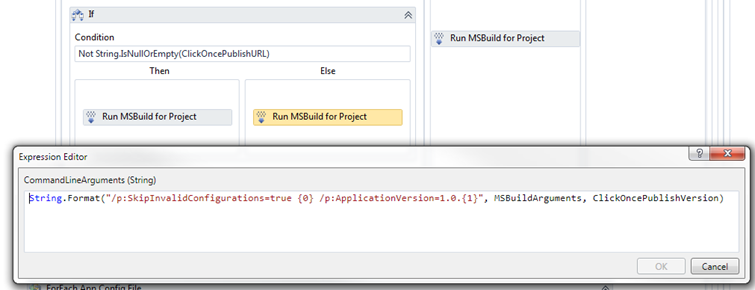
- No ClickOnce projects identified (standard MSBuild)
MSBuild (Publish)
Finally, at the end of the “Compile The Project” activity sequence, we will actually publish and deploy our ClickOnce applications by adding the following sequence.
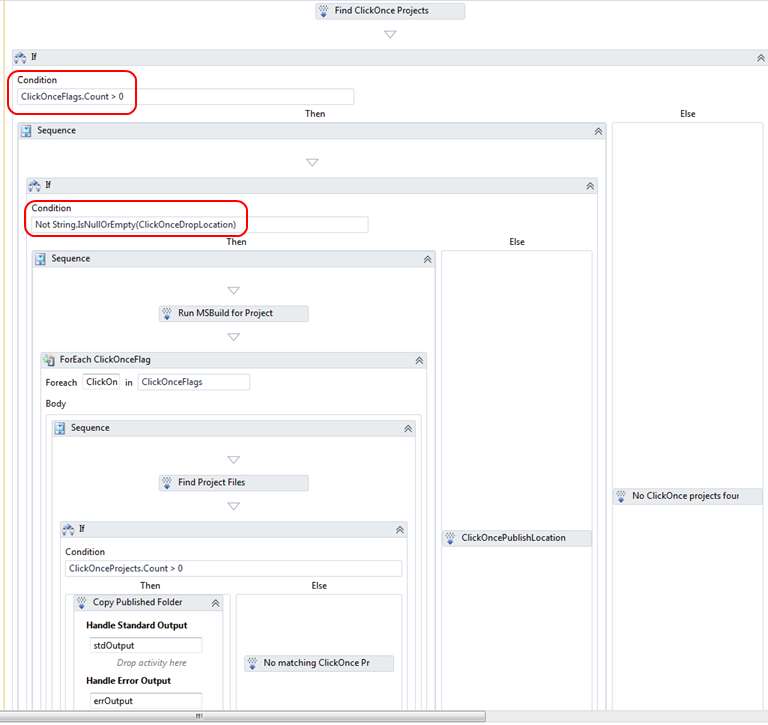
First we check again to see if there are any ClickOnce projects by checking the ClickOnceFlags variable.
Then we make sure that the ClickOnceDropLocation argument has been passed in, otherwise we display a build error message.
Now we actually run MSBuilid again setting the target to publish. Normal projects will be ignored, but ClickOnce applications will be published to an app.publish directory. Again, it is important to note that publishing from MSBuild using the “/target:publish” argument does not behave the same way as publishing from the Visual Studio IDE.

Out on the TFS Build Server, the app.publish directory will look like below for each ClickOnce project.
Note: The ClickOnceTestClient.application file is actually the ClickOnce manifest, not an executable. You can see it below opened in Notepad. Notice that all-important Publish Version highlighted. This manifest is the file that you will point your publish URL to out on the web server. More on that later.

After MSBuild has published our ClickOnce applications, we need to deploy them out to our ClickOnceDropLocation.
We grab the ClickOnce project name by executing a FindMatchingFiles activity. This looks in the same directories containing our ClickOnceFlags.txt files and assigns the .proj file paths into our ClickOnceProjects list variable. We use the project file path to xcopy our publish folder out to our drop location. We also use the project name to rename the publish folder out on the drop location to <projectname>.publish.
Finally, we use an InvokeProcess activity to xcopy our ClickOnce publish directories out to our ClickOnce Drop Location.
Web Site
That’s it for the workflow. If things executed properly, you should now have your published ClickOnce directories residing out at your ClickOnce Drop Location. Here’s our sample:
Now all you need to do is set up a virtual directory in your web site that points at this directory, then provide your user with the Publish URL, which in our sample is http://joeyweb.lab.com/clickoncetestclient/clickoncetestclient.application?activationkey=123456789.
Voila, your users can now simply navigate to this URL in their browser, install your ClickOnce application, and automatically get updates each time you do a new TFS Build! Enjoy!
App.<config>.config Addendum
A few other changes have been made to the latest version of the DontPanicWithClickOncePublishBuild.xaml file related to replacing app.config files with configuration-specific config, (i.e., app.lab.config). This is not ClickOnce-specific and applies to any unit test, test client, or application that needs different versions of their app.configs. Basically anything that is not a web application, which already has built-in support for multiple configuration files, will need these changes. Our previous build script already had support for these custom app.<config>.config files, but it did not work with many of our current solutions.
To support multiple app.configs, you simply need to add them to your unit test or other application like shown below, following the app.<config>.config naming convention.
Note: These need to be COMPLETE config files, not just transformations containing the differences like you would do with a web.<config>.config in a web application. We are doing a simply xcopy replace in our build workflow. Maybe someday when I have more time.
Build Workflow Notes
The workflow changes made to support this app.<config>.config file replacement are described below for those interested.
The big change to the workflow is that now we are going to do an xcopy replace of the app.config BEFORE the build. First we create a list of the app.config files in the solution.
Next we are going to loop through each found app.config and set the name of the replacement app.<config>.config file, then check to see if it exists.
If the replacement app.<config>.config file exists, we will do an xcopy to replace the original app.config.
Note: We have to use the “/R” in our xcopy arguments because the source app.config file is marked as read-only.
Then the build proceeds as normal. The new app.config file will contain our configuration-specific information and be renamed and copied out to the Binaries directory at compile time.
If there is not app.<config>.config file found, it will simply use the original app.config. So these app.<config>.config files are optional, not required.
Ok, now that hopefully is it for now, really!


